WordPress pages are generally used to display static content on your website that doesn’t get changed often. By default, all pages are public and accessible for everyone without restrictions. However, in situations where you have different content for public and members, private user page become an important feature. Private user page is a page that is restricted to certain users or user types. Unfortunately, WordPress doesn’t have built-in features to create any type of private page. Therefore, it’s important to learn the process of creating private user pages or using existing plugins to create private pages. In this article, we are going to discuss to how to create basic private user page and use advanced features from existing plugins.
There are different types of private pages based on restriction levels. Using a private page to provide personal content for each user is the most common use of private page. However, we can also use this feature to protect page content from group of specific users or user roles. Through out this article, we will be looking at the use case for providing private content for each user.
Let’s identify the 2 main ways to implement private user page using WordPress.
- Using default WordPress pages and restricting it to specific user
- Using a custom form and a shortcode on a page
Using default WordPress pages for Private User Page
This is the simplest way of creating a private page for a user. In this method, we have to create a new page for each user and assign the user to the page using post meta values. Then we can add the private content by choosing the user’s page.
In this article, we are going to keep the implementation as simple as possible. So we will use custom meta fields to assign the user ID to each page. Let’s start by creating a new page in WordPress. Once you get WordPress page creation screen, you need to enable custom fields by enabling Custom Fields from Screen Options menu. Now your screen will look like the following image
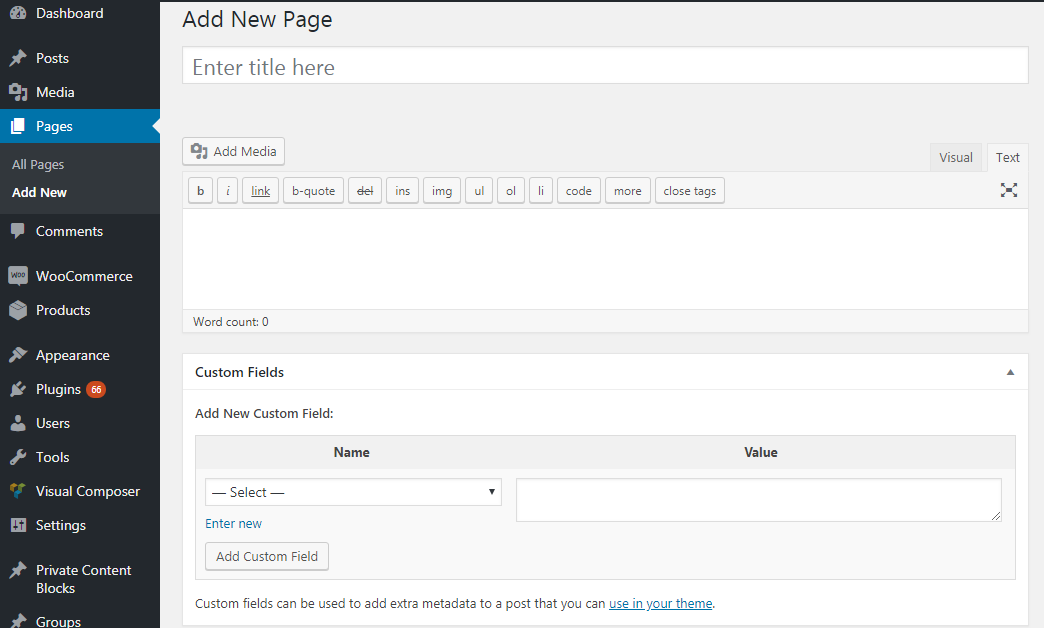
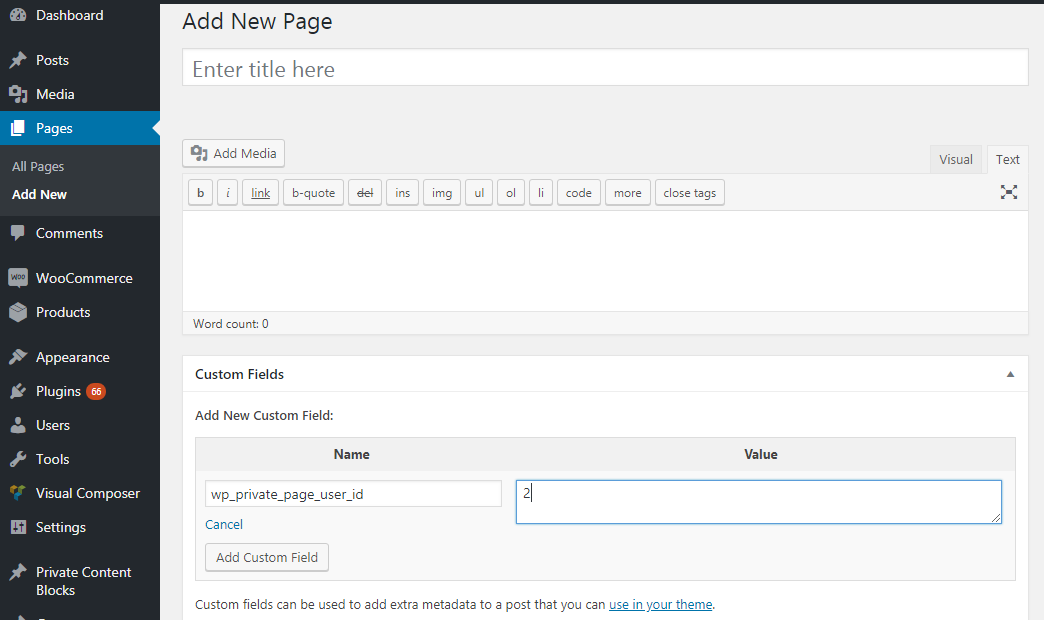
Now click on Add Custom Field -> Enter New option and you will get 2 fields to add name and value. These post meta fields will be used to add the user ID for the page. So we add a key called wp_private_page_user_id and assign the ID of the user for this page.
Finally, you should add the content for that user and hit the Publish button. Now private page is created for a single user. The next task is to make sure that only assigned user can access the contents of this page. So we have to use WordPress template_redirect filter to check the necessary permissions and allow the content.
add_action('template_redirect', 'wcp_validate_private_page_restrictions', 1);
function wcp_validate_private_page_restrictions(){
        global $wp_query;

        $user_id = get_current_user_id();
        if (! isset($wp_query->post->ID) ) {
            return;
        }

        if(is_page() || is_single()){
            $post_id = $wp_query->post->ID;
	    $post_user = get_post_meta($post_id,'wp_private_page_user_id',true);
	    if($post_user != '' && $post_user != $user_id){
		wp_redirect('http://example.com/private-content-redirect');exit;
	    }
       }
        return;
}
We use the WordPress template_redirect filter to check the permission of loaded post/page and make the necessary redirection. So, we start by checking whether this is single page using is_page conditional function. Then we grab the user ID assigned to the page get_post_meta function. Finally, we check whether logged in user is same as the user assigned to the page. We make a custom redirection for users who don’t have permission to access the page. You can simply add this code to functions.php file of your theme to assign private pages to individual users.
Pros/Cons of Using default WordPress pages
- Easy to implement for simple private page needs
- We have to assign a new page for each user and hence there are large amount of WordPress pages in site with many users.
- It’s difficult to add private content for a user. We have to search many pages and identify the owner of that page.
Using a custom form and a shortcode on a page
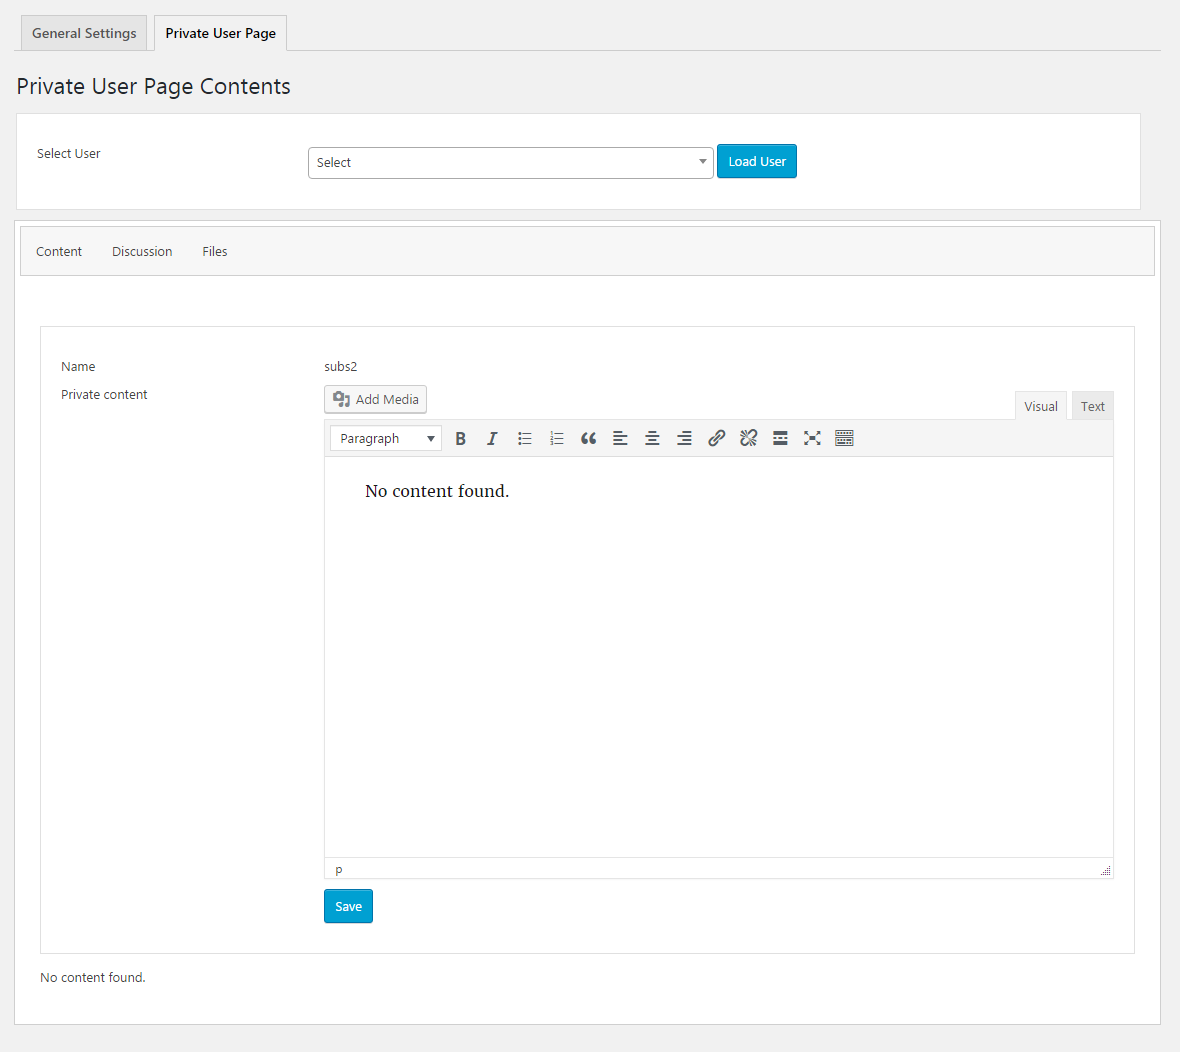
This is the ideal method of creating private user page where you only need to use single page for all users on your site. In this technique, we need to create a custom form, with ability to choose a user from the existing user base and field to add the private content for the chosen user. We can add this by creating a WordPress settings page with a custom form as shown in the following screenshot. Then admin can choose the user and add the content for that user.

In the previous technique, we used WordPress pages and hence we were able to use the existing posts and postmeta database tables. However, this technique doesn’t use pages and hence we need a custom database table to store private content for each user.
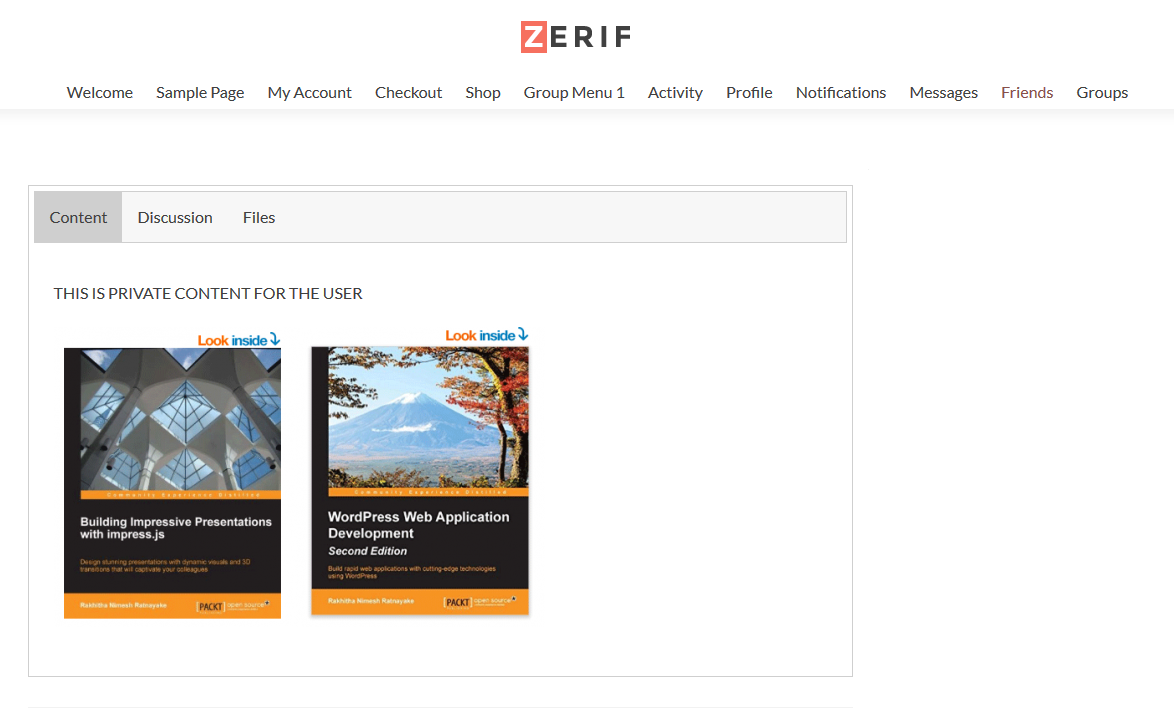
Next, we create a shortcode that takes the ID of logged in user and displays the content for the user from the custom database table. Finally, we create a single page and assign the shortcode to that page. Now any user can view this page after login and only the protected content for that user will be displayed.
Pros/Cons of Using default WordPress pages
- Easy to manage since all users are handled from one place
- Flexibility in managing private content since it uses custom database table
- Implementation is difficult compared to previous method
Implementing Private User Pages with WP Private Content Plus
We discussed 2 techniques for implementing private user pages in WordPress. Both of these features are available in our WP Private Content Plus plugin. This plugin provides the ability to select a user in method 1 instead of adding user ID to page. You can install this plugin for free and use one of those 2 techniques for creating user/member specific private pages.
Creating Private Member Portal
Up to this point, we discussed the techniques of creating basic private user page with private content. Private member/client portal is an advanced version of private page where different types of private content are separated into sections. Let’s identify practical use cases for a member portal.
Example 1 – Assume you are online instructor and you teach a certain subject. So you need the ability to add text, images, video based content private for your students. This is possible with the techniques we discussed earlier. However, you also need features like add students specific grades, exams as files, ability to talk with student about the course and send notifications about the course. Its not possible to implement such features with the previous methods.
Example 2 – Assume you are a doctor and you keep record of your patients. So you need the ability to keep text, images, video based content of your patient. This is possible with the techniques we discussed earlier. However, you also need features like add patient specific reports as files, ability to talk with patients about the illness history. Its not possible to implement such features with the previous methods.
We use advanced member/client portals for such requirements. Generally, these portals consists of multiple tabs where general content, files and messages are grouped separately. Implementing this is complex compared to previous techniques. Therefore we are going to use an existing plugin to implement and understand member portals.
Advanced Private Member Portal with WP Private Content Pro
WP Private Content Pro is the premium version of our WP Private Content Plus plugin and it offers the features for private member portals. Once this plugin is installed, you will get a backend private portal for admin with tabs for content, files, messages and notifications. Admin can add different types of private content by selecting the user and content will be stored in multiple custom database tables.
Next, we use the shortcode method discussed previously to add the private portal shortcode to the frontend page. Now, once the user is logged in, user will be redirected to their private page and private portal will be displayed as shown in the following screen.
You can easily use WP Private Content Plus or WP Private Content Pro plugins to implement your private page needs based on your requirements.