This tutorial is part of the Building Visual Composer Addon Development Made Easy course by WPExpert Developer. Today we are going to create a basic content restriction Visual Composer Addon that let’s you restrict certain post/page content to guests or members. We will be updating this tutorial to add more content restriction options through wide range of Visual Composer Components. Let’s get started.
Introduction to Visual Composer Addon for Content Restrictions
The most common requirement of content restriction is ability to shown certain content to public and change the same content and display new content once the user is logged into the site. Generally, you need to use membership or content protection plugin to implement such a requirement. Its not ideal to use advanced content protection or membership plugin for such a simple implementation. Also it might be difficult to use those content protection features inside Visual Composer page layout, unless you are familiar with HTML layouts and shortcodes. So in this tutorial, we will be creating a simple Visual Composer Addon to add different content for guests as well as members.
Visual Composer consists of shortcode components to provide various features. There are several ways of implementing content restriction as Visual Composer shortcodes. We are going to keep things simple by introducing 2 different shortcode components for Restrict Content for Guests and Restrict Content for Members.
Let’s start the implementation.
Building Visual Composer Addon for Content Restrictions
First, we have to create a normal plugin file to define our Visual Composer Addon as a WordPress plugin. Consider the following code for the initial content for our main plugin file.
'.sprintf(__('%s requires Visual Composer plugin to be installed and activated on your site.', 'vc_wpe_cp'), $plugin_data['Name']).'
';
}
}
new VC_WPE_Content_Protection();
This is a modified version of Visual Composer Starter Plugin to suit our requirements. As you can see, first we check the existence of Visual Composer core plugin using showVcVersionNotice function. We have to display a message to user to enable Visual Composer, in case its not already activated on the site.
Creating Visual Composer Elements
Now we can move into developing our own requirements for this addon. Baasically, we need 2 shortcodes to display content only to guests and display content only to members. So we have to add shortcodes to this addon. Let’s consider the modified constructor function with the 2 shortcodes.
function __construct() {
  add_action( 'init', array( $this, 'integrateWithVC' ) );

  add_shortcode( 'vc_wpe_guest_content', array( $this, 'renderGuestContent' ) );
  add_shortcode( 'vc_wpe_member_content', array( $this, 'renderMemberContent' ) );
}
We have introduced 2 new shortcodes called vc_wpe_guest_content and vc_wpe_member_content. These shortcodes will be implemented by renderGuestContent and renderMemberContent functions of our addon.
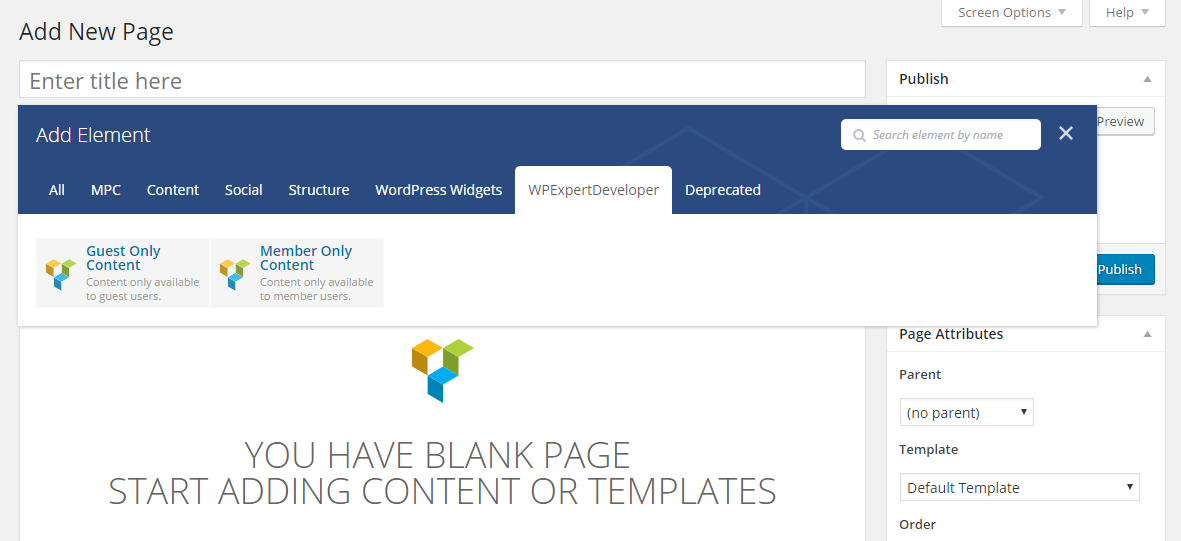
Before implementing these functions, we need to define these shortcodes as Visual Composer elements using its vc_map function. This function allows you to register shortcodes to Visual Composer element interface. Also we can add settings (attributes) for our shortcodes as parameters to this function. Let’s start with renderGuestContent integration with Visual Composer.
We are using this function to only allow content to guests. So we need to identify the settings for this shortcode. First, we need a textarea setting to add the allowed content for guests. Then we need a setting that enables/disables a message to restricted users. Finally, we need a setting to add the restriction message. So let’s start with vc_map implementation for vc_wpe_guest_content shortcode by adding following code to integrateWithVC function.
vc_map( array(
            "name" => __("Guest Only Content", 'vc_wpe_cp'),
            "description" => __("Content only available to guest users.", 'vc_wpe_cp'),
            "base" => "vc_wpe_guest_content",
            "class" => "",
            "controls" => "full",
            "category" => __('WPExpertDeveloper', 'vc_wpe_cp'),
            "params" => array(
                array(
                  "type"        => "dropdown",
                  "heading"     => __("Content Restricted Message Status", 'vc_wpe_cp'),
                  "param_name"  => "message_status",
                  "admin_label" => true,
                  "value"       => array(
                    __("Disable", 'vc_wpe_cp') => 'disabled' ,
                    __("Enable", 'vc_wpe_cp') => 'enabled'
                  ),
                  "std"         => '1',
                  "description" => __("Enable/Disable restriction message.", 'vc_wpe_cp')
                ),
                array(
                  "type" => "textfield",
                  "holder" => "div",
                  "class" => "",
                  "heading" => __("Content Restricted Message", 'vc_wpe_cp'),
                  "param_name" => "message",
                  "value" => __('Content is restricted','vc_wpe_cp'),
                  "description" => __("Message for restricted users.", 'vc_wpe_cp')
               ),
               array(
                  "type" => "textarea_html",
                  "holder" => "div",
                  "class" => "",
                  "heading" => __("Protected Content", 'vc_wpe_cp'),
                  "param_name" => "content",
                  "value" => __("", 'vc_wpe_cp'),
                  "description" => __("Enter your content.", 'vc_wpe_cp')
               ),

            )
        ) );
Let’s identify the components of vc_map function as this is our first tutorial in this series.
- name – This is the name of your Visual Composer element. You will see the element in VC elements list with this name.
- description – This is a short description about your element. it will be displayed under title in Visual Composer elements list. So make sure to keep it short.
- base– This is the shortcode tag name.
- class – This is a custom class that adds custom styles to your output.
- category – This is the category which your element is displayed. By default, there are 3 categories called Content, Social, Structure. You can also create your own category by providing a unique name here.
- params – These are the custom settings for your shortcodes.
Once these shortcodes are matched, you will have the Visual Composer elements screen as shown in the following screenshot.

Now you should be able to integrate new shortcodes into Visual Composer using this method. You can find all the available attributes at Visual Composer Documentation. Next, we can identify the parameters and how to use them in your shortcode.
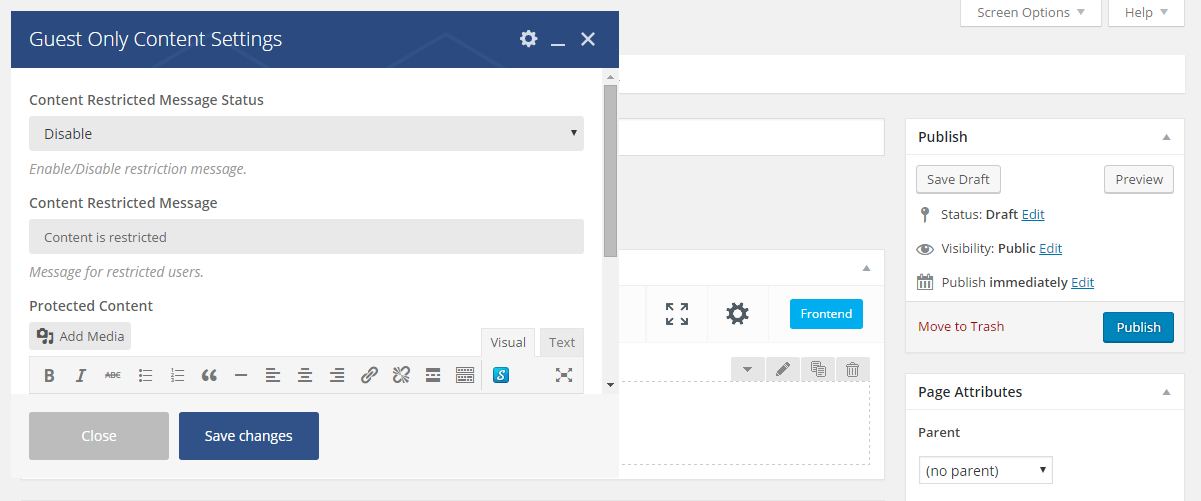
In the previous code, we have 3 elements in params array for 3 settings. Let’s identify the attributes for adding parameters.
- type – This is the type of your settings field. In our scenario, first setting will be a dropdown field. You can also use common other field types such text, textarea, checkbox etc depending on your needs. You can find all available field types at Visual Composer website.
- heading – This is the displayed label for your setting.
- param_name – This is the unqiue slug of the param for this shortcode. This name will be used to access the setting values inside the shortcode.
- value – This is the value for your setting. Since we have a dropdown field, we define all the available options in an array. If we are using a text field, we have to define a single string instead of an array. Visual Composer will update this value with the custom value once you save the settings.
- std – This is the default selection for dropdown field. If you are using a text field, this attribute will not be used.
- description – This is the text that explain how to use this overall setting and how it affects the output.
Once these settings are added, you will have the settings screen for the shortcode as shown in the following screenshot.

Now we have completed integrating vc_wpe_guest_content shortcode into Visual Composer interface. Adding vc_wpe_member_content shortcode is similar and hence we are not going to disscuss it in this tutorial. You can duplicate the vc_map function and change the values as necessary for vc_wpe_guest_content shortcode.
Implementing Guest Only Content Shortcode
We have integrated our shortcodes to Visual Composer interface. Next, we have to implement the shortcode to restrict content for other users and only allow content for guests. So let’s take a look at the implementation of renderGuestContent function.
public function renderGuestContent( $atts, $content = null ) {
      extract( shortcode_atts( array(
        'message_status' => 'enabled',
        'message' => __('Content is restricted','vc_wpe_cp')
      ), $atts ) );
      $content = wpb_js_remove_wpautop($content, true);

      if(is_user_logged_in()){
        if($message_status == 'enabled'){
          $content = $message;
        }else{
          $content = '';
        }
      }
      return $content;
}
We start by specifying the default shortcode attributes and default values. Here, we have 2 settings and the content added in previous section. We have enabled the message by default and added a default restriction message. Then, we filter the content using wpb_js_remove_wpautop function to remove unnecessary paragraph tags. Finally, we check whether user is logged into the site. If not, user is considered guest and we display the content without any modification.
When the user is logged in, we check whether message is enabled using the attributes we defined in the previous section. If the message is enabled, we get the message from the passed attribute values and display it to the restricted user. If the message is disabled, we remove the content and display empty content.
You might be wondering why we need to enable/disable the message. In some scenarios, we need to restrict certain content from certain users. However, we also want to let other users know that content exists and they don’t have permission and instructions on how to get permission to content. Also there are other scenarios where we just want to display some content for guests and replace/hide that content once user is logged in.
Now we have completed this tutorial on building Visual Composer Addon for basic content restrictions. You can implement the renderMemberContent function in the same way. Only change will be replacing if(is_user_logged_in()){ with if(!is_user_logged_in()){ code.
We hope you enjoyed the tutorial and learn how to build a basic content restriction addon. You can extend this addon with other advanced features such as user role based content restrictions. Let us know your suggestions so that we can improve our future tutorials on Visual Composer Addon development.


